

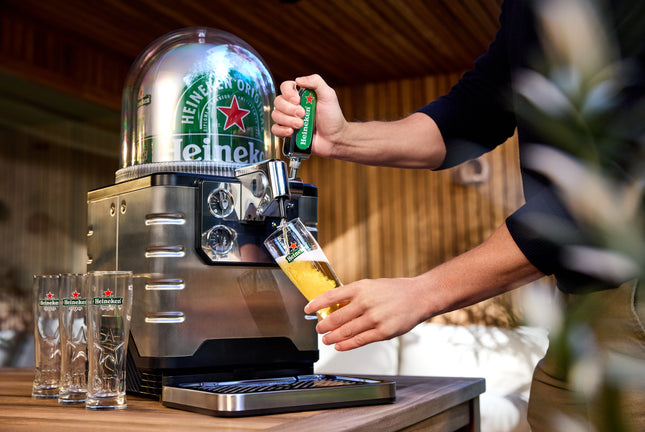
HOE SLUIT IK DE BLADE BIERTAP AAN?
Zo installeer je je biertap voor thuis
De BLADE biertap installeren is heel simpel. Alles wat je nodig hebt, is een geschikte plek om je biertap neer te zetten, met een stopcontact in de buurt. Er is geen koolzuurgas, extra koelapparaat of technologie nodig. Alles wat je nodig hebt om het perfecte bier te tappen, zit al in het tapsysteem van de BLADE biertap zelf.
DE BESTE PLEK VOOR JE BLADE BIERTAP
Om ervoor te zorgen dat de BLADE-biermachine soepel en veilig werkt, is het belangrijk om deze op de juiste locatie te plaatsen. Kies een stevige, vlakke ondergrond die het gewicht van de machine kan dragen en zowel hitte- als waterbestendig is. Plaats de machine op een plek met gemakkelijke toegang tot een stopcontact, zodat je deze snel kunt loskoppelen indien nodig. Voor optimale prestaties houd je de machine in een omgeving met een temperatuur tussen 10°C en 38°C en een maximale relatieve luchtvochtigheid van 75%. Door deze richtlijnen te volgen, kun je thuis zorgeloos genieten van perfect getapt bier wanneer je maar wil.
BLADE installeren
Zodra je de perfecte plek voor je BLADE hebt gevonden, kun je beginnen met de installatie.
Je BLADE wordt geleverd in twee dozen: één met de machine en één met de koepel. Na het uitpakken van het apparaat laat je het ongeveer 2 uur rusten. Ondertussen kun je de tapkraan bevestigen en het lekbakje monteren.
Taphendel op de BLADE biertap bevestigen
-
Bevestig de hendelschaft van de tap aan het schroefdraadmechanisme aan de rechterkant van de biertap.
-
Draai de schacht stevig vast met de meegeleverde steeksleutel.
-
Schuif de taphendel zo ver mogelijk op de schacht, zorg ervoor dat deze uitgelijnd is met de voorkant van de machine.
-
Gebruik de meegeleverde schroevendraaier om de stelschroef aan de onderzijde van de handgreep vast te draaien.
-
Zorg ervoor dat de handgreep stevig vastzit en niet kan draaien.
Lekbak aan de BLADE biertap monteren
-
Plaats de basis van de lekbak met de lekbakafdekking voor het apparaat.
-
Duw het voorzichtig naar voren totdat het vastklikt in de juiste positie.
-
Sluit vervolgens het elektriciteitssnoer aan op een stopcontact en controleer goed of de biermachine niet op het snoer staat, aangezien dit een onstabiele positionering kan veroorzaken.
EEN BLADE VAT IN DE BLADE BIERTAP PLAATSEN
Zorg ervoor dat je de BLADE-vaten minimaal 16 - 24 uur vooraf koelt voordat je ze in de machine plaatst. Zodra het vaatje goed gekoeld is, volg je deze stappen:
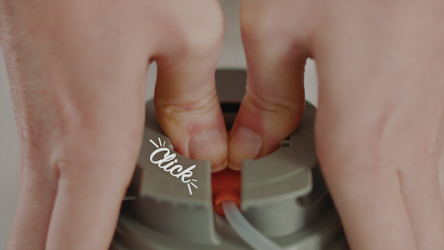
1. Druk op het oranje knopje
Wikkel de bierslang volledig af van de hals van de dop en druk op de oranje knop totdat je een ‘klik’ hoort.

2. Plaats je BLADE biervat
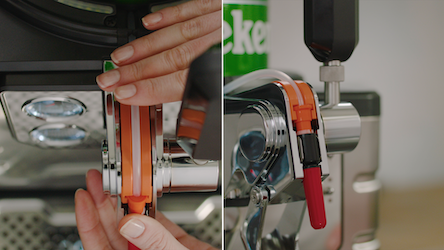
Open de tapafdekking en plaats het vat voorzichtig in de koelkom, terwijl je het rechtop houdt. De slang moet aan de voorkant van het vat zitten en naar de voorkant van de machine wijzen. Geef het vat een lichte draai om ervoor te zorgen dat het goed op zijn plaats zit.
Controleer of de slang van het vat correct is geplaatst en uitgelijnd is met de oranje groef. Gebruik je duim om het onderste zwarte deel van het ventiel stevig in de metalen ventielhouder te drukken om het vast te zetten.
Klap de tapafdekking omhoog totdat deze vastklikt. Als de afdekking terugveert, controleer dan de positie van de bierslang en het ventiel. Verwijder tot slot de rode dop.

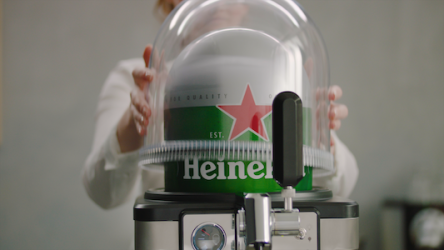
3. Plaats de koepel erbovenop
Plaats de koepel over je BLADE. Dit helpt om je bier lekker koel te houden en maakt het mogelijk om het apparaat te verlichten. Zet eenvoudig de schakelaar met de lampjes aan de zijkant om!

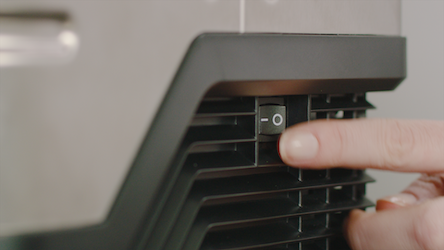
4. Zet je BLADE biertap aan
Zet de machine aan door de AAN-UIT-schakelaar aan de rechterkant in te drukken.

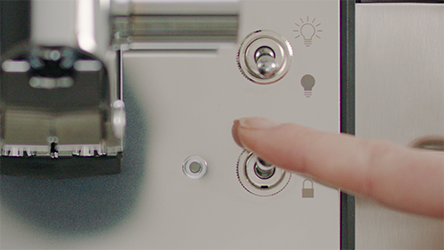
5. Vergrendel het vat
Zet de schakelaar naar beneden om het vat in je BLADE te vergrendelen. Het indicatielampje zou nu continu groen moeten branden.
Het vat is nu vergrendeld en je zult horen dat de pomp positieve druk in het vaatje genereert. Na ongeveer 30 seconden stopt de pomp en zou alleen de koelingsventilator nog hoorbaar moeten zijn.

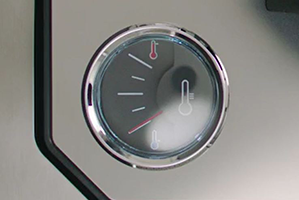
6. Controleer de temperatuur
Bekijk de temperatuurmeter om te controleren of het bier de juiste temperatuur heeft bereikt voordat je begint met tappen.

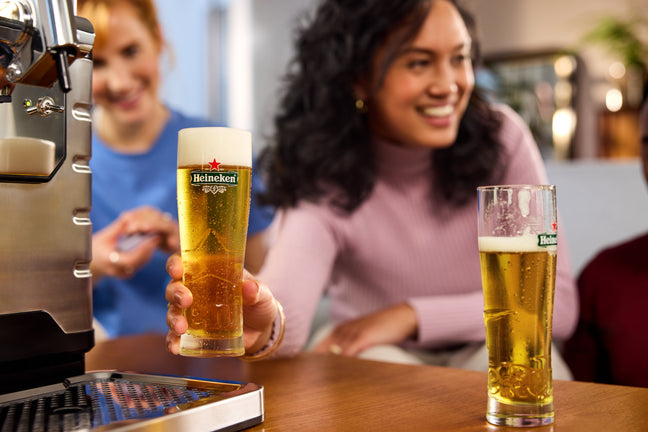
Je bent nu klaar om als een pro te tappen!🍺
Wil je weten hoe je het beste kunt tappen? Ontdek hier alle tips voor de beste schuimkraag. Wist je dat het ook belangrijk is om je bierglazen goed schoon te houden? Ontdek nog meer tips op Beerwulf.com.